Introduction
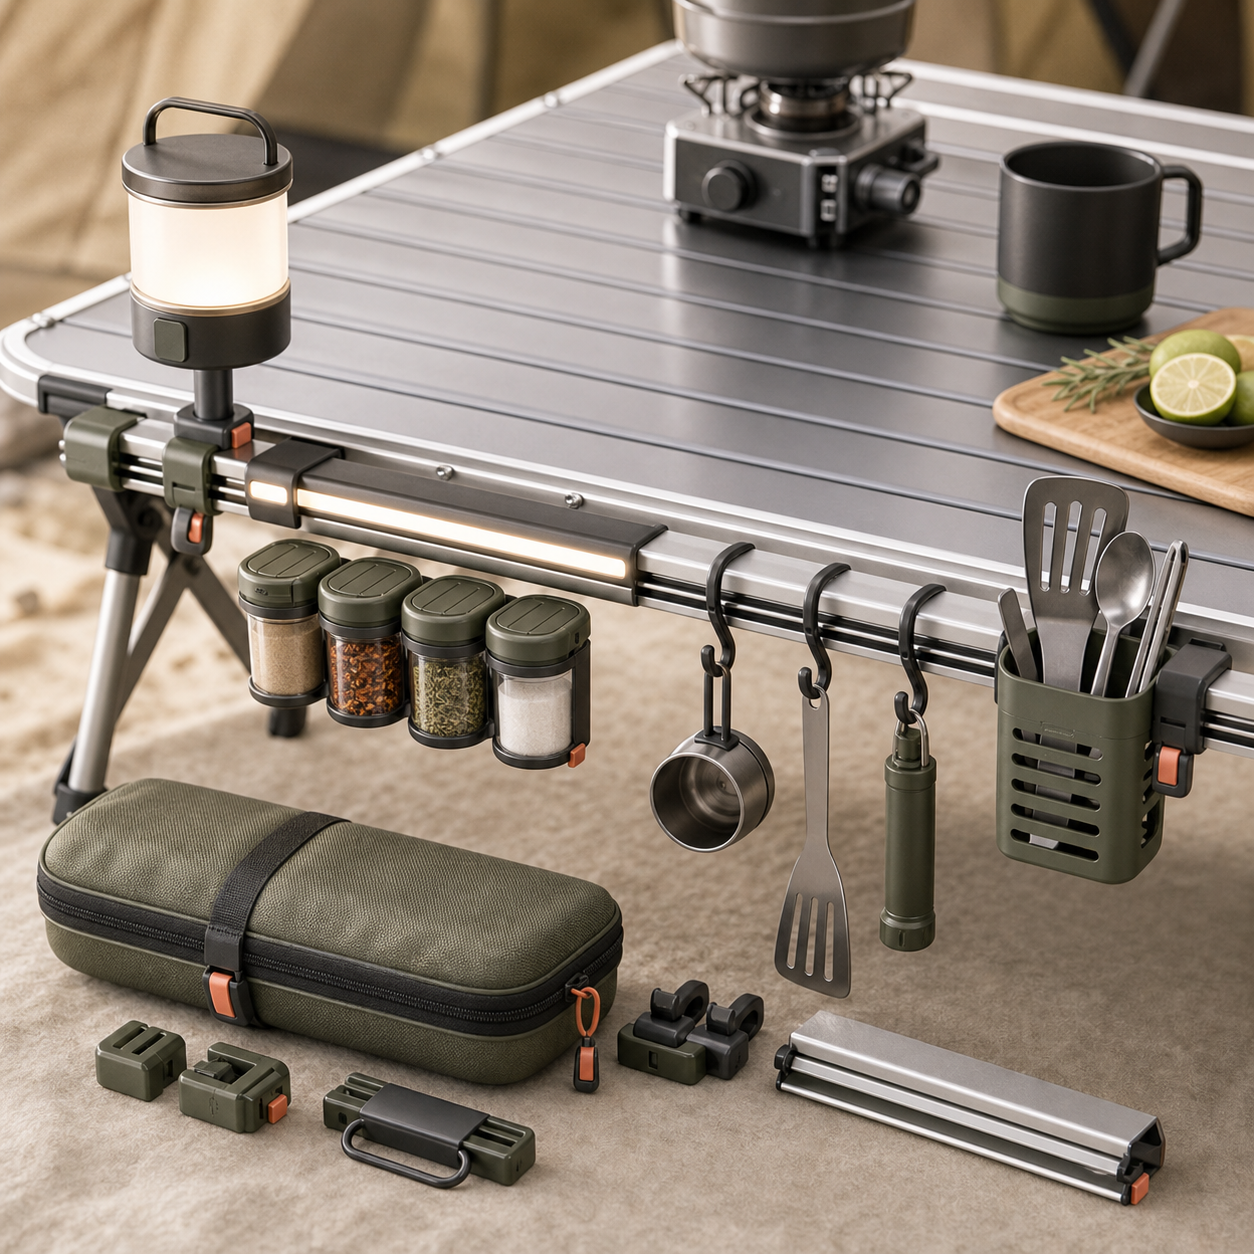
A camp-table light rail is an installation system, not just a lamp. Its light has to illuminate the prep surface, the rail must hold utensils without tipping, and any cable must stay clear of heat, water and the cook's hands. The KudBo camp-table light rail is presented as a modular light and utensil-rail accessory. Buyers should confirm the quoted attachment, power source and accessory pack; photographs cannot establish electrical ratings or wet-use approval.
The attachment buyer guide examines fixture fit. This article focuses on the combined lighting and cooking layout, particularly the difference between a dry tabletop demonstration and a campsite where surfaces, weather and power sources vary. The checks below are suggested procurement steps, not a report of completed factory tests.
Draw the Cooking Layout Before Choosing Brightness
Sketch the table from above. Mark food prep, stove or grill, clean utensils, dirty utensils, cable path and available edge for a clamp. A bar mounted in the center can cast a shadow over the cutting area; one mounted at the side may blind a seated user. Ask a reviewer to prepare a simple no-cook meal at dusk with the rail in place. Observe whether the person repeatedly moves the lamp, catches a sleeve on hooks or has to reposition the table.
Evaluate the lamp's orientation and diffuser with the actual accessory mounted. A quoted brightness value does not explain glare, beam spread or shadows. If the supplier wants to make a lumen or runtime claim, request the test setup, battery state and operating mode. A consumer may prefer a lower, even output for prep rather than a very bright narrow beam. Do not assume that a product shown outdoors is rated for rain; the instructions should clearly state its intended environment.
Check the rail's utensil spacing. Ladles and tongs vary in handle shape, and a crowded rail may leave items touching the table or heat source. Define a practical hanging load with actual cookware. Inspect whether the rail twists when a heavy utensil is removed. A secure clamp in an empty product photo is not proof that the loaded setup stays upright on a lightweight folding table.
Trace Power and Cable Routes
The CPSC extension-cord business guidance provides context if a retail scenario involves a separate mains extension cord; it is not a rating for the light rail or its USB cable.
Identify whether the quoted version is rechargeable, uses removable cells, needs an external power bank or offers more than one mode. List the exact cable and connector in the bill of materials. If a cable is needed during operation, route it along the table edge and simulate normal movement around the station. Look for a pinch point at the clamp, a trailing trip line and a route too close to a burner. A long cable may reach a power bank but create a new snag hazard; short cables can force the power bank next to wet food prep.
Test charging and lighting as separate user tasks. If the unit does not operate while charging, say so. Check connector cover fit, charging indication and the steps needed to dry a wet connector before charging. An IP code should be advertised only when the exact configuration and test documentation support it. A USB-shaped socket alone says nothing about water ingress protection, input power or outdoor suitability.
The CPSC extension-cord safety guidance is useful background when a buyer considers mains-powered campsite setups. It does not approve this specific rail or any improvised power arrangement. For a portable accessory, recommend the manufacturer's intended power source rather than encouraging arbitrary adapters or unattended charging near cooking equipment.
Mid-Article CTA
Send Your Requirements with target table-edge sizes, preferred power source, utensil load and expected use environment. Email info@kudbo.com for a sample-review checklist tied to the actual configuration.
Define Wet-Use and Heat Boundaries
“Outdoor” can mean fair-weather picnic use or persistent exposure to rain, dust and salt air. Ask which one the design supports. Inspect the light housing, switch, connector and clamp after a light splash that matches the stated use, only when the supplier's instructions allow it. Do not devise an immersion trial for a unit never claimed to be immersible. If a weather claim is central to the listing, require test evidence for the assembled unit, not only the LED module.
Set a minimum clearance from open flames or hot pans based on material and the manufacturer's documented instructions. Test where users are likely to attach the rail relative to a stove. Plastic hooks may not be appropriate over sustained heat even if the LED itself remains cool. A photograph showing the rail beside a grill can unintentionally imply safe heat exposure. Stage application images around realistic, supported placement.
Ask how the rail drains and cleans. Cooking grease, sand and condensation can accumulate around hinges and clips. Determine whether accessories can be detached for wiping and whether cleaning instructions distinguish electrical from non-electrical parts. The product may be easier to support if a damaged hook or light module can be replaced separately; secure part numbers before marketing modularity as a benefit.
Pack-Out and Shipment Inspection
At sample approval, write a kit list: light module, rail segments, hooks, clamp or bracket, cable, storage wrap and instructions. Every variant needs its own list. Test assembly from carton to table without reference to a demonstration video. A buyer should note not only whether the rail attaches but whether it can be removed without scratching a common tabletop finish under the instructed method.
For shipment inspection, check dimensions, finish, clamps, electrical marking, connector cover, operating modes and the counted accessories. Define a functional check: attach to the agreed sample edge, power on in the approved mode and confirm that the light stays oriented when a representative utensil is removed. This does not prove a long-term durability claim; it catches assembly and pack-out errors before shipment.
Avoid overclaiming sustainability or campsite safety. If a battery or electronic module is present, confirm destination-market documentation and transport handling with the logistics provider. The retail page should show the complete in-box kit, a truthful powered setup and the location of the power source. A user who understands these constraints is less likely to treat the rail like a permanently weatherproof installation.
Choosing a Retail Use Claim
The same rail could be sold as a task light, an utensil organizer or a modular cooking-station accessory. Choose the claim that the quoted configuration and tests support. If the light runs only while connected to an external power bank, a photograph with no visible cable may create a false impression of cordless use. If the rail is safe only in fair weather, do not show it operating in heavy rain. A buyer should approve lifestyle images against the installation and electrical instructions, not treat imagery as a separate marketing layer.
Ask a retailer to compare this rail with a separate lantern and hook system. The integrated product may reduce setup pieces but could be harder to place on a table with an unusual edge. The comparison should cover table compatibility, where the light falls, storage size, cleaning and replacement modules. A modular system is valuable when parts can be replaced; otherwise “modular” may only mean more small pieces to lose. Count and label those pieces in the pack.
After a pilot sale, support should categorize reports by attachment, light output, power, weather expectations and missing accessories. A customer who cannot clamp the rail to a thick table needs fit guidance or an adapter; one with a dead light needs electrical troubleshooting. The supplier should be able to identify a clamp or light revision from a part number. This is the practical path from a promising campsite concept to a repeatable wholesale program.
Define an Evening-Use Pilot
Run a campsite-style pilot with no cooking flame: table, utensils, food-prep props and the actual power source. The goal is to observe light and workflow without creating an unnecessary burn risk. Have one person assemble the rail from the retail carton, place utensils and switch modes, while another person notes where the cable, clamp and hooks interfere. A fixture that needs a third hand to keep it level should not be described as effortless to set up.
Repeat the scene at the edge of dusk and after dark. Record what the light actually illuminates and whether the person can distinguish a clean utensil from a used one. Check whether the diffuser throws light into the eyes of someone seated opposite. If the rail is adjustable, ask how many adjustments are needed for the typical prep zone. A beautiful overhead glow can still leave the cutting area in shadow. Photography for the listing should show both the full table and the actual work area.
After the dry pilot, evaluate weather exposure as a separate engineering question. Ask for the documented ingress rating of the assembled product, not only the LED strip. If connectors are not weather-rated, the instruction card must say so even if the rail is advertised for camping. A zipped storage pouch can protect the product in transit but does not establish safe operation in rain. Check how the clamp and hooks respond to condensation or grit, and whether they can be cleaned without wetting the electrical module.
For a wholesale specification, define a table-edge fit range, representative hanging load, mode-specific runtime test and exact in-box power accessories. This is more actionable than a list of adjectives such as bright, durable and waterproof. At pilot shipment, inspect whether each carton contains the approved clamp and hooks. A missing mounting piece can make a perfectly functional light unusable on arrival.
Purchase-Order Questions That Prevent Ambiguity
Ask the supplier for a drawing of the clamp's supported edge range, the rail's installed height and the location of every hook. This lets a retailer compare the product with tables already sold in its assortment. If an adapter is needed for a thick lip, quote it as an item rather than assuming the customer will improvise a spacer. Request photographs from the side and below the table as well as from the front; the underside is where the most important fit conflicts appear.
Specify the lighting system by actual inputs: power source, connector, supplied cable, mode controls and the approved operating environment. Ask for mode-specific runtime evidence if a battery is included and for water-ingress documentation only when the finished assembly is marketed for wet use. The accessory list should name spare hooks, end caps and carrying parts. A buyer can then compare complete kits, not just the bar's unit price. A replacement light module is useful only if it can be ordered and installed under the supported instructions.
Agree on a practical acceptance demonstration for sampled units: mount to the reference table edge, hang an agreed utensil load, route the cable as instructed and run the light in each mode. Record whether the mount shifts or the beam moves. This is a short shipment check, not a long-term outdoor durability claim. Keep rain, heat and repeated-use tests in separate evidence files. If a supplier changes the clamp spring, hook geometry or electrical module, repeat the relevant check before treating the new batch as equivalent.
For the retail page, use a fair-weather application photo if that is the validated use. Include an image of the packed kit and a diagram of the power path. A professional buyer can evaluate a clearly bounded product; uncertainty about whether a power bank or clamp is included is a faster route to returns than a modest light-output limitation.
Frequently Asked Questions
Does a camp-table light rail need a power bank?
That depends on the quoted version. Confirm its actual power source, connector, cable and whether it can operate while charging. Do not infer a built-in battery from a product photograph.
Is the rail safe to leave outside in rain?
Only if the assembled product's documented rating and instructions cover that exposure. “Outdoor” by itself is not a water-ingress specification. Protect connectors and follow the maker's charging guidance.
Can the rail fit every folding camp table?
No universal fit should be assumed. Check edge thickness, lip geometry, surface protection and loaded stability on the table models relevant to the target buyer.
What should an importer ask about lighting performance?
Ask for mode-specific runtime, brightness test conditions, beam spread, glare and charging behavior. Review the use setup with normal utensils, not only an isolated lamp measurement.
Are replacement hooks and light modules available?
Availability is supplier- and revision-specific. Request part numbers, lead times and compatibility rules before promising long-term modular service.
Conclusion
A useful camp-table rail makes the cooking area clearer without introducing an awkward clamp, cable or weather misconception. Buyers should test a complete dusk setup, define the power and wet-use boundary, and inspect a finished retail pack. That gives customers an achievable application rather than a decorative outdoor image.
Final CTA
Get a Quote by sending table-edge dimensions, desired kit components and market requirements to info@kudbo.com. Explore the product catalog, buyer blog and product sourcing articles for related comparisons.